Sunday, 26 November 2023

Advent wreath


In my last blog post I showed some Advent wreaths from previous years, that I had made.
Since it´s such a nice tradition and I also like to craft with my kids, I decided to make one also this year.

The kids had found some horse chestnust and snail shells earlier and I got an idea that we could use them in the wreath. To make them a bit more festive and christmassy, I gave glitter glues to the kids and asked them to decorate the chestnuts with them.

I´m not a big fan of bling bling, but the glitter gave just a bit of the needed touch for the decoration and they did not turn out too kitchy (in my opinion) ;) 


I attached the chestnuts by drilling a hole to them and sticking a toothpick inside. In this way it´s easy to apply to the wreath and you don´t need a glue for this.

a bought set of candles for each advent

The candle holders I had saved from previous years.
I try to reuse things as much as I can or by second hand.
It´s not necessary to always buy everything new! Second hand shops are usually full od christmas decorations before christmas and you can use them also as a material for something else!


Friday, 10 November 2023

NEW START

Ok folks, almost 10 years have past since my last blog post, so maybe it´s time to start again. 
What should I say.. life happened.
There were so many changes in my life after the last post, that I somehow lost myself in between and could´t concentrate on blogging anymore. Although I really loved it.

So I will start by telling what happened in between.

I broke up from a really long relationship. Soon after this happened, suddenly I found the love of my life, the missing part, my soulmate (so cheesy, I know. But - true). But really the one person, that I just knew is the right one for me. And the feeling was mutual.

I became a mother of three kids: twins (a boy and  girl) were born in 2016 we got another girl in 2019.
The life with the kids has been so overwhelming, that I just almost stopped doing all the things I love: sewing and upcycling and blogging. As it often happens (I heard) amongst mothers, they forget themselves while concentrating on their kids and family...and it´s just freaking hard, just to somehow get through the days with small kids! ;)

Now, finally, the kids are getting bigger and I feel that I can start doing these things again.
I need this to keep sane. It brings be so much joy to be able to create things with my own hands.

Since the Christmas time is getting closer, I will post a few photos of Advent wreaths that I have made earlier. I didn´t make these from a scratch, so I had the basis ready, where I just added the decorations.
Hopefully I will manage to make one also this year ;)


I really like this tradition in Austria, it starts the awaiting for Christmas. You light up a new candle every Advent. The first Advent this year is on Sunday 3th of December. From then on, you light another candle each Sunday until the 24th. We didn´t have this habit in Finland, but something similar. When I was a child, we used to have a candle with all the dates of December until the 24th, and we would burn the candle each day a bit. It was a nice way to see, how many days there were left until Christmas.

The Christmas time has become a bit more special for me after having kids. I was always somehow a christmas person, but now it´s more about doing the preparations together. We do handicrafts, decorations, cards, small presents and bake cookies.. The kids are always very excited and it gives me a lot of joy to do this together, pass on traditions and learn new things to them.

Are you a Christmas person and what kind of traditions do you have?

P.S: I noticed recently, that I accidentially deleted some photos of my earlier posts and I´m figuring out the way to get them back. That´s why some of the posts are missing photos.. sorry about that.

Thursday, 4 December 2014

Jouluinen ovikoriste valoilla - Christmas decoration with lights


First I saw a this decorative branch in a store. After that I found a wooden heart.
What if I put them together? And then add some lights...
I managed to find Christmas lights that work with batteries and the color was just right too!


It took about half an hour of work..


So this is how it turned out!


Saturday, 25 October 2014

I love my new Vallila

Näin joskus netissä kuvan upeasta Vallilan Isadora-kankaasta. Ihastuin kuosiin niin paljon, että halusin saada siitä verhot olohuoneeseen. Pyysin vanhempiani lähettämään kangasta minulle Suomesta tänne Graziin.
***
I saw a picture of a beautiful fabric called Isadora, made by finnish manufacturer Vallila. I loved it so much that I wanted to make curtains out of it  to our livingroom. I asked my parents to send me the fabric here from Finland.


Valmisverhojakin on saatavilla, mutta niiden korkeus on vaan 240cm ja mä tarvitsin 255cm korkuiset. Nyt kun sain verhot ommeltua, niin ne näyttää vielä upeammalta kuin osasin edes ajatella! Jätin vanhat turkoosit valoverhot uusien verhojen kaveriksi, kun kokeiltuani uusia verhoja pelkiltään, ne oli mun silmään jotenkin orvot. No, mä tykkäänkin vähän runsaammasta tyylistä pelkistetyn sijaan.
***
There are also ready-made curtains, but they are only 240cm long and I needed them to be 255cm. Now when the curtaibs are finished, they look even more beautiful than in the picture I saw earlier. I left my old turquoise striped curtains with the new ones because when I tried the new ones by themselves, they looked a bit too simple to my taste. Well, I like a bit richer style anyway.


Verhot toimivat enemmänkin seinävaattena kuin varsinaisesti verhoina. Nuo seinät suorastaan huusivat jotain näyttävää ja värikästä! Olohuoneeseen tuli kyllä ihan erilainen tunnelma kun aiemmin.
***
The curtains are more like a wall textiles than curtains. The walls were just screaming for something showy and colorful! The livingroom has a totally different athmosphere now than before.


Laitetaanpas tähän samaan yhteyteen vielä muutama muukin juttu, josta ei tullut aikaisemmin blogattua. Ostin keittiöön jo aiemmin kangasta Suomesta. Tästä Vallilan Persikka –kuosista ompelin verhokapan ja kaitaliinan keittiöön.
***
So while we´re at it, i will put some earlier stuff here also, that I did not blog yet about. I bought a fabric from Finland to kitchen earlier. This is also from Vallila, called Persikka (Peach) and I made a curtain and a table runner out of it.


Makkarin verho tuli Suomesta muuttokuorman mukana. Väreihin sopivan päiväpeiton löysin Ikeasta tänne muuttomme jälkeen.
***
The curtain in bedroom is old and it came with us from Finland with all the other stuff. I found this bedspread from Ikea after we had moved here and it suits with the colors of the curtain perfectly.


Sunday, 8 June 2014

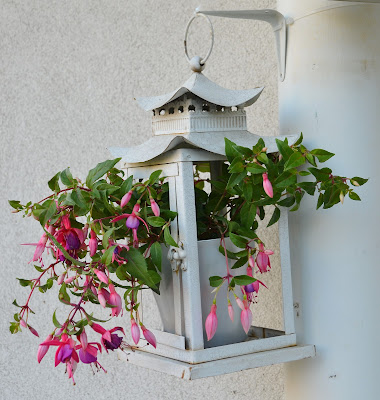
Amppeli lyhdystä – A hanging flowerpot from a lantern


Riisuin parvekelyhdyt kesäasuun ja ne saivat uuden tehtävän kukka-amppeleina
---
I undressed my lanterns to a summer outfit and they got a new job as hanging flowerpots


Lyhdyt ovat jo monta vuotta vanhat ja vähän ruostuneetkin mutta pidän niistä niin paljon etten halunnut vielä heittää niitä pois. Lyhdyn sivut olivat maitolasia. Lasit oli kiinnitetty kääntyvillä klipseillä joten niiden irroittaminen oli helppoa ja ne saa halutessaan laitettua takaisin. Lyhtyjen sisälle ostin Verenpisarat, joita rakastan! Vaati hieman kärsivällisyyttä yrittää pujotella oksat aukoista niin etten katkoisi niitä
---
The lanterns are many years old and also a bit rusty but I just like them so much that I didn´t want to get rid of them yet. The sides were of frosted glass and the glasses were attached with turning clips. Removing them was easy and I can put them back later if I want. Inside the lanterns I bought Fuchsia-flowers, which I just love! It took a bit of patience trying to get all the branches through the holes without braking them


DSC_2022
Vähän erilaiset amppelit.. joo, nämä on kyllä mun makuun!
---
A bit different kind of flowerpots.. Yeah I really like them!

DSC_2027
Parveke tuntuu jo vähän viihtyisämmältä nyt kun siellä on muutama kasvi ja saatiin sinne vihdoin pari tuoliakin hankittua. Toin sisäkasvitkin sinne saamaan aurinkoa ja tuomaan lisää väriä parvekkeelle. Vielä pitäisi löytää jotkut kivat pehmusteet tuoleihin…tai tehdä ne itse Winking smile
---
The balcony already feels a bit more homey now with a few plants and because we finally bought a few chairs there. I also brought my plants from inside to the balcony to get them some sun and to give more color to the balcony. Now I just have to find some nice paddings to those chairs…or make them myself  Winking smile

Monday, 2 June 2014

Huoparuusut – Felted roses

Sain Saksankurssini päätökseen ja halusin muistaa opettajia jollain itse tehdyllä pienellä lahjalla. Minulla oli valkoista ja sinistä esihuovutettua ohutta huopaa kotona.. kuinka sattuikaan että ne olivat juuri Suomen lipun värisiä! Sain tämän idean edellisenä päivänä, joten täytyi keksiä keino toteuttaa ruusut nopeasti ja mahdollisimman helposti.
---
My German class ended and I wanted to give my teachers something small and self-made. I had some pre-felted thin felt at home.. and they happened to be in the colors of a Finnish flag! I got this idea the previous day so I had to figure out a way to make these quickly and as simple as possible.

DSC_1736 
Kukkaosaa varten leikkasin palat sekä valkoisesta että sinisestä huovasta. Varresta tuli yksivärinen valkoinen. Ompelin kukka- ja varsiosan yhteen kevyesti ompelukoneella.
---
For the flower I cut pieces from both white and blue felt. I wanted the stem to be just white. I sewed parts for the flower and the stem together lightly with sewing machine.

DSC_1744

Muotoilin huovan kukaksi ja kiinnitin kukan muotoonsa muutamalla pistolla. Sitten heitin ruusun pesukoneeseen huopumaan.
---
I formed the flower to its shape and secured it with a few hand sewn stiches. Then I threw them to a waschine maschine to get them felted.

DSC_1739

Pesukoneesta tulon jälkeen laitoin varsiosan sisälle puutikun tukevoittamaan sitä huovutin vielä varsiosaa käsin saippuan kanssa. Onneksi olin pakannut Mäntysuopaa Suomesta muuttokuormaan.
---
After the washing maschine I inserted a wooden stick inside the stem and felted the stem a bit more by hands with soap. Fortunately I had packed Mäntysuopa (a Finnish soap made out of pine) in the moving truck.

DSC_1749

DSC_1748

Tällaisia niistä tuli --- This is how they turned out  

DSC_1754

Tein myös pienet Suomen lipun näköiset kiitoskortit
---
I also made these little thank you -cards that looked like Finnish flags

DSC_1752

Kiireestä huolimatta näistä tuli aika kivat
---
Despite that these were made in a hurry, I think they turned out quite nice

Monday, 28 April 2014

Sohvapöydän pelastus - Rescuing sofa table


DSC_0781
Ikean Lack sohvapöytä oli jo parhaat päivänsä nähnyt.
Ajattelin että tässä ei ainakaan hyvä pilalle mene jos sitä kokeilisi vähän tuunata paremmaksi..
---
 Lack table from Ikea had seen it´s best days already.
I tought it could not get any worse if I try to upcycle it a bit..


DSC_0783
Löysin rautakaupasta todella edullisia mosaiikkilaattoja, joten tämä tuunausprojekti ei ollut mikään kovin suuri investointi. Ei ainakaan harmita jos menee pilalle. Tämä oli ensimmäinen kerta kun kiinnitän laattoja yhtään mihinkään. Myyjä neuvoi kiinnittämään laatat silikonilla pöydän pintaan. Materiaalit maksoivat yhteensä noin 23€.
---
I found cheap mosaik tiles from a hardware store, so this project was not a big investment. Therefore I would not mind so much, if it diesn´t work. This was my first time, when I am putting tiles anywhere. The salesperson advised me to attach the tiles with silicon. The materials costed around 23€ altogether.


DSC_0787
Kuinka ollakaan kaapista löytyi vanhan jo poisheitetyn tehosekoittimen vispiläosa, jonka sai kiinnitettyä porakoneeseen laastin sekoittamista varten
---
I found old parts of a mixer and I could attach them to our drill for mixing the plaster for covering the seams.

DSC_0788


DSC_0785
Mallailin palat pöydän päälle ja leikkasin ylimääräiset pois. Levitin silikonia aina yhden laatan verran pöytään ja liimasin laatat yksi kerrallaan paikoilleen, koska silikoni alkoi kuivaa aika nopeasti
---
I spreaded the tiles to the table and cut the extra parts off. I spreaded silicon for one piece of tiles at once and attached them, because the silicon started to dry quite fast.


2014-04-27 13.04.19
Sivupalatkin asettui aika kivasti. Annoin silikonin kuivua yön yli ennen saumaamista.
---
Aso the sideparts placed quite nicely. I let the silicon dry overnight.


DSC_0791
Seuraavana päivänä saumaamaan
--
Next day I did the seaming


DSC_0798


DSC_0818
Siinä se nyt on valmiina!
--
And here is the result!


DSC_0816
Lopputuloksesta tuli sellainen kun olin toivonutkin.
Ei se ihan täydellinen ole, mtta yllättävän siisti siitä tuli näin ensikertalaiselta.
---
It turned out as I imagined or hoped.
It´s not perfect, but surprisingly neat, considering that this was the first time for me

Tuesday, 15 April 2014

Näkösuoja parvekkeelle - Cover for the balcony


DSC_0579
Uuden asuntomme parvekkeen kaide oli vähän liian läpinäkyvä. Kaipasimme vähän lisää yksityisyyttä joten kehittelin kaiteen peitoksi näkösuojan. Olin joskus ostanut valkoista kohokuvioista vahakangasta joihinkin juhliin ruokapöydän ja sohvapöydän suojaksi. Kangasta olikin aika riittoisasti. Taitoin molemmat liinat pituussunnassa kaksinkerroin ja leikkasin liinan kahtia taitteen kohdalta
---
We wanted to have a bit more privacy to our balcony, so I started planning something to use as a cover. I had some white plastic tabe cloth fabric, that used once before and there was quite much of it. I folded the fabric from the middle lengthwise and cut it to two pieces. It was just enough  for the balcony.

DSC_0581
Ompelin palaset yhteen yhdeksi pitkäksi kappaleeksi.
Saumakohdat vahvistin vielä päällitikkauksella.
---
I sewed the pieces together and got one long piece.
I made the seam stronger by sewing it once more with a top stich.


DSC_0584
Vähän hankalaa oli ommella jäykkää kangasta mutta onnistuihan se
---
It was a bit hard to sew such stiff fabric, but I managed

DSC_0585
Ja jälleen kerran hamstraaminen kannatti.
Kirpparilta ostetut kullanväriset purjerenkaat olivat tähän tarkoitukseen juuri sopivan kokoisia
---
Again it was worth buing something from fleamarket, without knowing exactly at that time, where to use it for. The golden eyelets were just the right size for this purpose.

DSC_0586
Laitoin kankaan yläreunaan renkaita 20 sentin välein, alareunaan harvempaan
---
To the top part of the cover I put the eyelets every 20cm apart, to the bottom with a bit longer distance.

DSC_0590
Valkoista naruakin löytyi sopiva määrä
---
And I happened to have white yarn, just the right amount!

DSC_0589
Siistinnäköinen sekä sisä että ulkopuolelta ja ajaa asiansa!
---
It looks neat both inside and outside and fulfills the purpose!